IRC can be a learning curve, but this guide will include all of the basics. Don’t be daunted by the length; some of these concepts just need a little extra explanation because of how conventionalised modern chat services are but are intuitive once you’re familiar with them.
You will not need to continuously refer back to this guide.
If you’re only going to be using IRC to chat, you’ll likely only need to read as far as 2.1 The Nickserv. If you’d like to create and administer your own community on an IRC server, however, you’ll need to know how to use the Chanserv and administer channel modes.
1. Starting out.
If you’re used to using apps such as Discord or Whatsapp, you’ll notice a few differences with IRC.
First, IRC is not persistent. This means that you’re connected only while you’re online, so you won’t see chat history or receive messages for the times you were offline, although as we’ll see below IRC has long had implementations that allowed us to work around these limitations.
If you’d like to chat over IRC, you’ll need to connect to an instance or ‘server’ before you’ll be able to. You will not automatically connect on opening your app.
There are two parts to IRC: the server, and the client. A server is hosted remotely, and will usually look something like irc.somename.com. In this instance, our server is going to be irc.haven108.au, although you do not need to connect to this server.
The first thing you’re going to need to chat is going to be a client.
1.1 Clients list
| Platform | Client | About |
| Windows | mIRC | A classic! mIRC was first released in 1995 and was many people’s first IRC client. Why fix it if it isn’t broken? |
| Windows/Unix/OSX | Quassel | Released in 2008 and available on multiple platforms. Quassel has a slightly more modern UI than mIRC. |
| Unix/OSX | WeeChat | WeeChat uses an ncurses interface, which basically means it’s very retro looking but also doesn’t have a point-and-click interface. If you like the retro vibe, you might enjoy it. If you want something easy to use, maybe choose one of the above. |
| Android | Revolution IRC | Available in the F-Droid store, which hosts open source freeware. It has all of the features of a PC based IRC client and offers some control over theme. |
| iOS | LimeChat | Unfortunately not free, but feature rich with a clean interface. iOS unfortunately does come with app backgrounding restrictions which may limit your ability to minimise the app without disconnecting from the server. |
| Web | KiwiIRC | Kiwi is a web-based IRC client, which means you can use it from any browser regardless of your device. |
Once you have your client, you’ll need your server details. Thankfully, you’re on the website for a server, so the details of the server you’d like to join are probably below. If you’d like to join another server, they’ll also likely have a website sharing their connection details.
1.2 Server settings
| Server: | irc.haven108.au |
| Port: | 6697 |
| SSL/TLS: | Yes |
| Nick | This is the name people will see for you when you speak. |
| Username | This will be the name that appears in your host, which we’ll use to identify you specifically and looks something like this: Username@your.irc.hostname.here |
| Real Name | This appears in your whois, and can help identify you when you change your nick. It doesn’t have to be your real name, but it should be something that doesn’t change. |
That’s all you’ll need, although depending on your client you’ll either find these settings in your Server settings, or it may be divided between Server and Identity settings. You’ll also find this information on the IRC Server Settings page.
Your client will have a lot of options that you don’t need to worry about, including SASL authentication. IRC servers can be very varied in their implementations, so your client will be designed to connect to as broad an array of servers as possible.
If you’re uncertain of how to use your client, visit the website of your client.
1.3 Connecting
Once you’re ready, you can connect. If your client provides you a view of the server window, you’ll be looking at a screen like the one below:
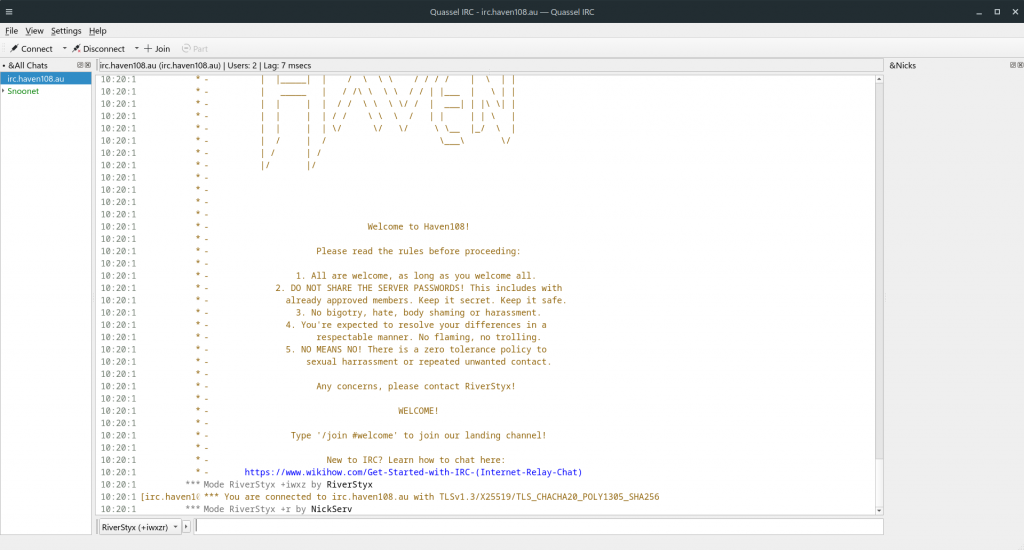
This is the server screen, and contains important information about your connection. It’s alright if a lot of what you see there doesn’t make sense, but the important thing to know is that, unless you’ve been issued connection errors, then you are connected to the server. That being said, we haven’t joined to any chats just yet, so you won’t have anyone to talk to at this stage.
1.4 Joining a channel
To connect to a chat room, or a channel in IRC terms, you’ll need to issue a command. On IRC, commands are issued by typing a forwards slash (‘/’) followed by your command.
You’ll find some common commands you’ll need below. Be sure to change the capitalised portion of the command to the value you want:
/join #CHANNELTo join a channel.
/nick NICKNAMETo change your nick.
/me MESSAGETo send a message in the third person, as an action (ie; * RiverStyx belches)
/msg USERTo send a message to a user.
/query USERTo open a private conversation with a user.
/away MESSAGETo set an away message to let users know you’re away from your keyboard or device, and
/quit MESSAGETo disconnect from an IRC server and send a quit message.
So to join your first channel, type the below:
/join #welcomeThe channel name we’ll be joining will always start with a hash (‘#’), so in this instance we’ll be joining the #welcome channel. A channel can be made up of any set of ASCII characters, which includes anything you can type using your keyboard.
Now, you’ll be in a channel full of people, so we’re ready to talk.
But hang on! How do you ensure that your nick remains yours? How do you take control of a channel, or make sure that it remains yours after you disconnect?
That brings us to our next section!
2. Services.
Services on IRC allow you to perform actions without needing to directly interface with the server itself. There are a range of services on an IRC server, but as an end user you’ll only need to deal with two of those: the Nickserv and the Chanserv.
2.1 The Nickserv
The Nickserv allows you to register and protect your nick. This creates a sense of security around your identity, since you’ll be able to set a password and prevent others from assuming your nick.
The first thing we’re going to do is to register your nick, so let’s issue the command below, changing PASSWORD and EMAIL to your preferred password and your email address:
/msg nickserv register PASSWORD EMAILWhat we’ve done above is to send a message to the nickserv with a series of commands. You can use the same syntax to send a message to a user, replacing “nickserv” with the nick of the user you’d like to message.
You may receive a message saying your nick is already registered. If that happens, and you did not register this nick, then that means it is owned by somebody else and you will need to choose another.
Once done, your nick will be yours! You’ll still need to actively use it to keep it, and how long you can go between logins before your nick registration expires will vary from server to server. For this server, that length is 365 days.
You should be able to set your client to auto identify with the nickserv on connect, but if you’d like to identify manually, you just need to issue the below command:
/msg nickserv identify PASSWORDOnce you’ve done that, you’ll be fully registered and ready to chat! If you’d like the Nickserv to protect your nick, so that anybody else who assumes it will need to identify or have their nick forcefully changed, you can use the below:
/msg nickserv set secure on2.2 The Chanserv
The Chanserv manages the registration and ownership of channels. Without it, nobody would really own a channel and it would be impossible to possess and run your own space on IRC.
If you’re uncertain of whether or not a channel is registered, you can check this by issuing the below command, changing #CHANNEL to the name of the channel you’d like to register:
/msg chanserv info #CHANNELIn this instance, we’ve received the below response:
[10:09:20 am] [ChanServ] Channel #CHANNEL isn't registered.
This means our channel does not have an owner at the moment, and is free to register! If it had been registered, we’d see something similar to the below:
[10:11:19 am] [ChanServ] Information for channel #welcome:
[10:11:19 am] [ChanServ]      Founder: RiverStyx
[10:11:19 am] [ChanServ]  Description: Landing channel
[10:11:19 am] [ChanServ]   Registered: Nov 30 12:20:11 2025 UTC (2 days, 10 hours, 51 minutes ago)
[10:11:19 am] [ChanServ]    Last used: Dec 02 23:11:19 2025 UTC (now)
[10:11:19 am] [ChanServ]     Ban type: 2
[10:11:19 am] [ChanServ]    Mode lock: +nt
[10:11:19 am] [ChanServ]      Options: Peace, Security, Secure founder, Signed kicks, Topic retention
[10:11:19 am] [ChanServ]   Last topic: Welcome to the party!
[10:11:19 am] [ChanServ] Topic set by: RiverStyx
This shows us the name of the channel, the owner of the channel, the time the channel was registered and the topic of the channel, among other pieces of information that are not relevant to us just now including the modes.
Let’s assume that our channel is not currently registered and we would like to do so. First, let’s join the channel:
/join #CHANNELOnce you’ve joined, if you’re the only person in the channel the server will automatically give you privileged permissions and we can then register the channel with the below syntax:
/msg chanserv register CHANNEL DESCRIPTIONIn this instance, CHANNEL is the name of our channel, and DESCRIPTION is a short description about who we are and what we’re about. So let’s go ahead and register:
[10:18:15 am] [ChanServ] Channel #CHANNEL registered under your account: RiverStyx
[10:18:15 am] *** Mode #CHANNEL +rq RiverStyx by ChanServ
Now, if we issue the info command, we’ll see the below:
[10:23:20 am] [ChanServ] Information for channel #CHANNEL:
[10:23:20 am] [ChanServ]     Founder: RiverStyx
[10:23:20 am] [ChanServ] Description: Hello this is a channel
[10:23:20 am] [ChanServ]  Registered: Dec 02 23:18:15 2025 UTC (5 minutes ago)
[10:23:20 am] [ChanServ]   Last used: Dec 02 23:23:20 2025 UTC (now)
[10:23:20 am] [ChanServ]    Ban type: 2
[10:23:20 am] [ChanServ]   Mode lock: +nt
[10:23:20 am] [ChanServ]     Options: Peace, Security, Secure founder, Signed kicks, Topic retention
This channel now belongs to us!
Now you’ll need people to help you moderate your channel. On IRC, these are called operators or ‘ops’ for short. We can give somebody an operator privilege by setting a mode, for example ‘/mode #CHANNEL +o PERSON’. This will give the user with the nick of PERSON ops, but it will be persistent and they will lose their ops if they disconnect or leave the channel.
To give them permanent ops, we’ll need to add them to the channel’s privileged users. The hierarchy of privileged users is as follows:
- The channel founder.
- The founder has the highest level of privilege in the channel and can voice, devoice, ban, kick, op and deop anyone.
- The founder of a channel cannot be changed without deregistering the channel.
- SOPs (super ops).
- SOPs can add or remove AOPs, ban users, kick (or remove) users, akick (autokick, or a lasting kick) users, set modes, set the channel topic and send channel memos.
- AOPs (auto ops).
- AOPs cannot add or remove ops, but can still ban and kick users and set modes and the channel topic.
- VOPs (voiced users).
- A voiced user is able to continue speaking if the channel is set to a mode that only allows privileged users to chat, but does not have any administrative powers.
To set an SOP, issue the following command:
/msg chanserv sop add HOSTNotice we said HOST here and not NICK. The reason for this is that we want to be able to continue to op a user regardless of what nick they are using. To check a host, issue the below command:
/whois NICKThis gives us the below response:
[10:49:29 am] * [Whois] RiverStyx is RiverStyx!AnActualLa@a.real.user.host (An Actual Labrador)
[10:49:29 am] * [Whois] %1RiverStyx is using modes +irwxz
[10:49:29 am] * [Whois] %1RiverStyx is connecting from *@a.real.user.host 123.45.67.89
[10:49:29 am] * [Whois] %1RiverStyx is identified for this nick
[10:49:29 am] * [Whois] RiverStyx is a user on channels: ~@#CHANNEL
[10:49:29 am] * [Whois] RiverStyx is an operator on channels: #te$t_channel #test_channel
[10:49:29 am] * RiverStyx is online via irc.haven108.au (Haven 108)
[10:49:29 am] * [Whois] %1RiverStyx is using a Secure Connection [TLSv1.3/X25519/TLS_CHACHA20_POLY1305_SHA256]
[10:49:29 am] * [Whois] RiverStyx is away: "RiverStyx"
[10:49:29 am] * [Whois] RiverStyx is logged in since 2025-12-02 23:49:23 UTC
[10:49:29 am] * [Whois] RiverStyx is idling for 6 sec (2025-12-02 23:49:23 UTC)
[10:49:29 am] * [Who] End of /WHO list for %1
The information we need in that response is the below:
@a.real.user.host
This information is unique to this user and will not change unless the user’s ISP is changed or they start using a different method of connection. If we wanted to sop this user, we’d issue the below command:
/msg chanserv sop add *@a.real.user.hostWhat we’ve done here is to use a wildcard (‘*’) followed by the user host to say “sop anyone with this user host”. That way, regardless of what nick this user is using, they’ll be recognised as a chan op by the chanserv and will have their privileges activated upon connection. This also allows us to prevent a user from receiving an op if they assume the nick of another user.
If multiple users are using the same connection to chat, we can replace the ‘*’ with the user’s nick to ensure that the op is specific to the user and not anyone else who may be using their connection.
If you’d like to instead AOP this user, just change ‘sop’ to ‘aop’, and the same for ‘vop’.
2.3 The Memoserv
The Memoserv is the last of the services we’ll cover today, although it is also the simplest.
As we talked about previously, IRC does not keep you persistently connected, so you’re only able to send messages to a user if they are actively connected to a server. This can be difficult if you’d like to leave somebody a message, but we get around this using the Memoserv.
Let’s say we want to send somebody a memo that they’ll see the next time they log in. We can do this with the below command, replacing NICK with the nick of the person we’re contacting, and MESSAGE with the message we’d like to send:
/msg memoserv send NICK MESSAGEOnce we’ve issued that, we’ll see the below:
[11:00:45 am] [MemoServ] Memo sent to NICK.
Then, the next time they login they’ll see this:
[11:00:45 am] [MemoServ] You have a new memo from RiverStyx.
To read our memo, we just need to issue the below:
/msg memoserv read newWhich gives the below feedback:
[11:07:29 am] [MemoServ] Memo 1 from RiverStyx (Dec 03 00:00:45 2025 UTC (6 minutes ago)).
[11:07:29 am] [MemoServ] To delete, type: /msg MemoServ DEL 1
[11:07:29 am] [MemoServ] hi
Our memo will not be deleted until after we issue the delete command shown above, so you can retain these. If you’d like to list your memos, you can also issue the below:
/msg memoserv listAnd if we’d like to read a memo from the list, we can use the below, replacing NUMBER with the number of the memo as it appears in our list:
/msg memoserv read NUMBERIf we’re finished with a memo, we can delete it with the below:
/msg memoserv del NUMBER3. Administering a channel.
Now that you know the basics of how to access and chat on an IRC server, let’s talk about how to administer a channel. You’ll need this information if you’d like to create your own community on IRC.
3.1 Channel modes
Modes allow us to change the conditions of a channel, for example who is allowed to join and participate.
To set a mode, we’ll issue the below command, replacing $ with the mode we’d like:
/mode CHANNEL/NICK +$You may have noticed that we’ve said CHANNEL or NICK here. This is because modes can be placed on a channel OR a user. In most cases, you won’t need to set user modes as these will be handled by the server and the nickserv direct.
If we wanted to make a channel moderated, for example, so that only users who have been voiced can participate, an operator would be able to issue the below comand:
/mode #CHANNEL +mWith this mode set, anyone can join and read messages, but only users with voice privileges can send messages. To give voice privileges, we can issue the below:
/mode #CHANNEL +v NICKNow this user can chat! However, this change isn’t persistent, so if this user quits the channel or disconnects and then returns, it will need to be set again. We can get around this by giving this user VOP:
/msg chanserv vop add NICKWe can also use modes to prevent users from joining a channel, by setting a ban. To ban a user, we’d issue the below:
/mode #CHANNEL +b *@a.real.user.hostIt’s important to use the wildcard (‘*’) followed by the user host here, rather than just banning the nick alone. If we didn’t take this step, the banned user would just be able to change their nick and rejoin.
If you’d like to remove any of these modes, we would just change the + before the mode to a -.
You’ll also find a list of commonly needed channel modes below:
| Mode | Use |
| +n | Disallows members who are not in the channel from sending messages to the channel. |
| +t | Only ops can set the topic. |
| +p | Hide the channel from /list results. |
| +s | Set the channel as invisible in both /list and /whois results. |
| +i | Only users who are invited with /invite can join. |
| +k [pass] | Only users who have the channel password can join. (/join #CHANNEL password) |
| +l [num] | Limit the channel to a maximum number of users. |
| +m | Set the channel so only ops and voiced users can send messages. |
| +R | Set the channel so that only registered nicks are allowed in. |
| +M | Set the channel so that only registered nicks can speak. |
| +S | Strip formatting from text, rendering as plaintext only. |
| +c | Disallow colour codes from being used in messages. |
| +N | Disallow all nick changes from being made from users in a channel. |
If you have made it this far, then congratulations! You are fully equipped to begin chatting and administering a channel.